Table of content
Table of Contents
Introduction
As the crisp air and golden leaves signal the arrival of autumn, nothing quite captures the essence of fall baking like bakery-style pumpkin scones. These tender, flaky treats blend the cozy warmth of pumpkin with fragrant spices, evoking memories of bustling coffee shops and cozy kitchens. Whether you’re sipping your morning coffee or hosting a casual gathering, pumpkin scones bring a touch of seasonal magic that’s hard to resist.
But what truly sets bakery-style pumpkin scones apart from your typical homemade batch? It’s all about mastering the balance between flaky layers and moist crumb, infusing rich fall flavors, and finishing with that perfect glaze or sprinkle. In this guide, you’ll discover five delicious ways to make pumpkin scones, each with expert tips on achieving bakery perfection at home. From classic spiced pumpkin scones to those with decadent chocolate chips or a hint of citrus zest, we’ve got your cozy autumn cravings covered.
Get ready to dig into the science of texture, the art of flavor layering, and the secrets to flaky, tender scones you’ll want to make all season long. Whether you’re a seasoned baker or a beginner eager to try something new this fall, these recipes and insights will help you bake like a pro and fill your home with that unmistakable autumn aroma.
Ingredients List
When it comes to crafting the perfect bakery-style pumpkin scones, every ingredient plays a vital role—not just for flavor, but for texture and structure. Understanding why we use each component will elevate your baking game and ensure consistent results.
All-purpose flour (2 ¼ cups): This provides the base and structure of the scone. The gluten in the flour develops just enough to give the scones a tender crumb without toughness. You can substitute with a 1:1 gluten-free flour blend for a gluten-free alternative, though texture may differ slightly.
Baking powder (1 tbsp) and baking soda (½ tsp): Both are leavening agents, helping your scones rise and become airy. Baking powder acts immediately with heat; baking soda activates with acidic ingredients like buttermilk or pumpkin puree, giving an extra lift.
Brown sugar (½ cup, packed): This adds moisture and a subtle caramel note that complements the pumpkin’s earthiness. You can use coconut sugar for a slightly different flavor or white granulated sugar for a cleaner sweetness.
Cold unsalted butter (½ cup or 1 stick, cubed): Butter is key to flaky scones. Cold butter creates pockets in the dough during baking, producing that tender, flaky texture. Using salted butter is fine, but reduce the salt elsewhere.
Pumpkin puree (¾ cup): The star ingredient, it adds natural moisture, sweetness, and that quintessential fall flavor. Avoid pumpkin pie filling, which contains added sugars and spices; use pure pumpkin puree for control over spices and textures.
Buttermilk (¼ cup): The acidity in buttermilk reacts with baking soda for proper rise while adding subtle tanginess. If you don’t have buttermilk, make a substitute by adding 1 tbsp vinegar or lemon juice to ¼ cup milk; let sit for 5 minutes.
Egg (1 large): Eggs bind ingredients and provide structure for the scones. For a vegan option, flax or chia eggs can sometimes work but may alter texture.
Vanilla extract (1 tsp): Enhances all flavors, making the spices and pumpkin pop.
Ground spices (1 tsp cinnamon, ½ tsp nutmeg, ¼ tsp ground ginger, ⅛ tsp cloves): The classic warm spice blend gives pumpkin its signature fall flavor. Adjust or substitute to taste, like using pumpkin pie spice blend directly.
Salt (½ tsp): Balances sweetness and enhances the overall flavor.
Optional add-ins: Chocolate chips, chopped pecans, dried cranberries, or orange zest can add texture and complementary flavors.
Each ingredient must be measured with care and incorporated thoughtfully. For example, using cold butter and not overworking the dough ensures the scones remain tender and flaky rather than dense. The careful balance of liquids like buttermilk and pumpkin puree ensures moistness without sogginess.
Timing
Timing is critical in baking bakery-style pumpkin scones. The entire process usually takes about 40 to 50 minutes, including preparation and baking.
Prep time: 15–20 minutes
This includes mixing your dry ingredients, cutting in butter, folding in wet ingredients, and shaping the dough.Resting time (optional): 10 minutes
Some bakers like to chill the dough briefly before baking to help butter solidify and prevent spreading, which enhances flakiness.Bake time: 18–22 minutes
Baking until golden-brown with a slightly crispy exterior but tender interior is key.
Allowing the dough some rest before baking promotes better rise and texture. Quick baking at the right temperature (around 400°F or 200°C) develops that bakery-style crust. It’s important not to overbake, as this dries out the scones.
Step-by-Step Instructions
Print
Bakery-Style Pumpkin Scones
- Total Time: 35 mins
- Yield: 8 scones
Description
Warm, flaky, and bursting with fall flavor, these bakery-style pumpkin scones are the perfect autumn treat. Made with pumpkin puree, cozy spices, and topped with a sweet glaze, they’re tender inside with a golden crisp outside. Perfect with coffee or tea, these scones bring a touch of seasonal bakery magic straight to your kitchen.
Ingredients
- 2 ¼ cups all-purpose flour
- 1 tbsp baking powder
- ½ tsp baking soda
- ½ cup brown sugar (packed)
- ½ tsp salt
- 1 tsp cinnamon
- ½ tsp nutmeg
- ¼ tsp ground ginger
- ⅛ tsp cloves
- ½ cup cold unsalted butter (cubed)
- ¾ cup pumpkin puree
- ¼ cup buttermilk (or substitute with milk + 1 tbsp vinegar/lemon juice)
- 1 large egg
- 1 tsp vanilla extract
- Optional add-ins: chocolate chips, pecans, dried cranberries, or orange zest
- Prep Time: 15 mins
- Cook Time: 20 mins
- Category: Weight Loss Meals
- Method: Baking
- Cuisine: American
Step 1: Prepare the Dry Ingredients
Begin by sifting together the all-purpose flour, baking powder, baking soda, salt, and warm spices—cinnamon, nutmeg, ginger, and cloves—in a large bowl. Sifting helps remove lumps and aerates the flour, which contributes to a lighter final texture. Whisk the ingredients thoroughly to ensure the leaveners and spices are evenly distributed, so every bite bursts with flavor.
Pro tip: Mix your spices freshly ground for more vibrant aroma. Also, pre-measuring and setting aside all dry ingredients can streamline your baking process.
Step 2: Cut in the Butter
Add cold, cubed unsalted butter to the dry mixture. Using a pastry cutter, two forks, or your fingertips, quickly cut the butter into the flour until it resembles coarse crumbs with some pea-sized butter pieces remaining. These little pockets of butter will melt during baking, creating steam and resulting in flaky layers.
Pro tip: Keep the butter as cold as possible, working swiftly to prevent it from softening. If the kitchen is warm, chill the flour mixture briefly between cutting in butter.
Step 3: Combine Wet Ingredients and Mix Dough
In a separate bowl, whisk together pumpkin puree, buttermilk, egg, brown sugar, and vanilla extract until smooth. Gradually stir the wet mixture into the dry ingredients using a spatula or wooden spoon, mixing just until combined. Avoid overmixing—stop when you no longer see dry flour.
Variations: Try folding in chocolate chips or chopped pecans right after mixing the wet and dry ingredients for extra texture and flavor. For a citrus kick, add orange zest at this stage.
Step 4: Shape and Cut the Dough
Turn the sticky dough onto a lightly floured surface and gently pat it into a 1-inch thick circle or rectangle. Using a sharp knife or bench scraper, cut the dough into 8–12 wedges or squares, depending on your shape choice.
Cooking science tip: Avoid overworking the dough here to keep the gluten minimal, which results in tender scones. Patting, not rolling, maintains those crucial butter pockets.
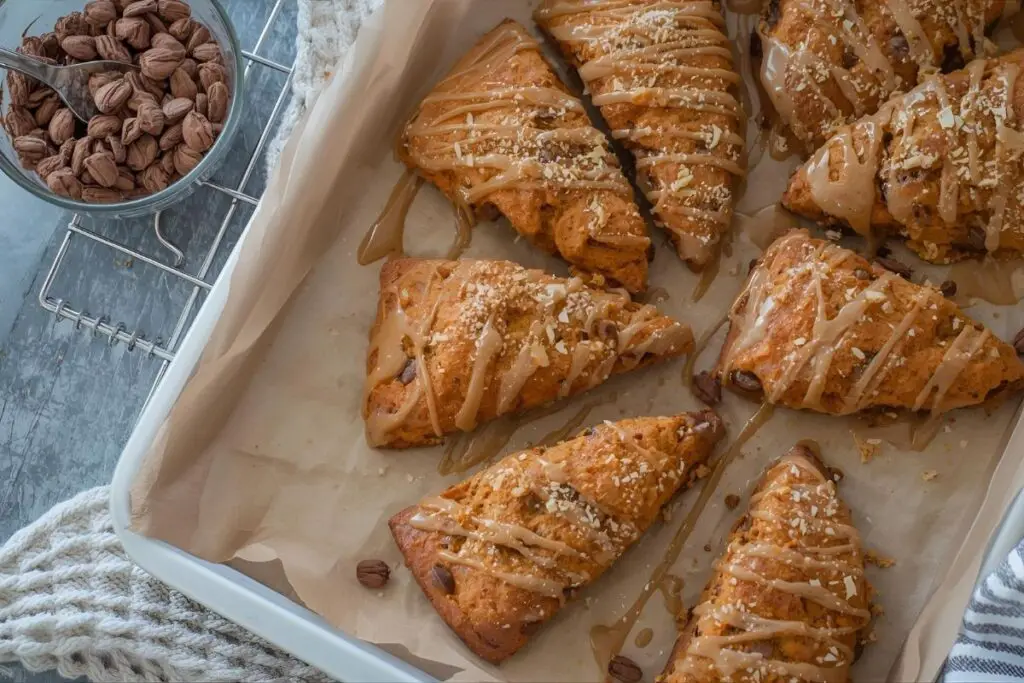
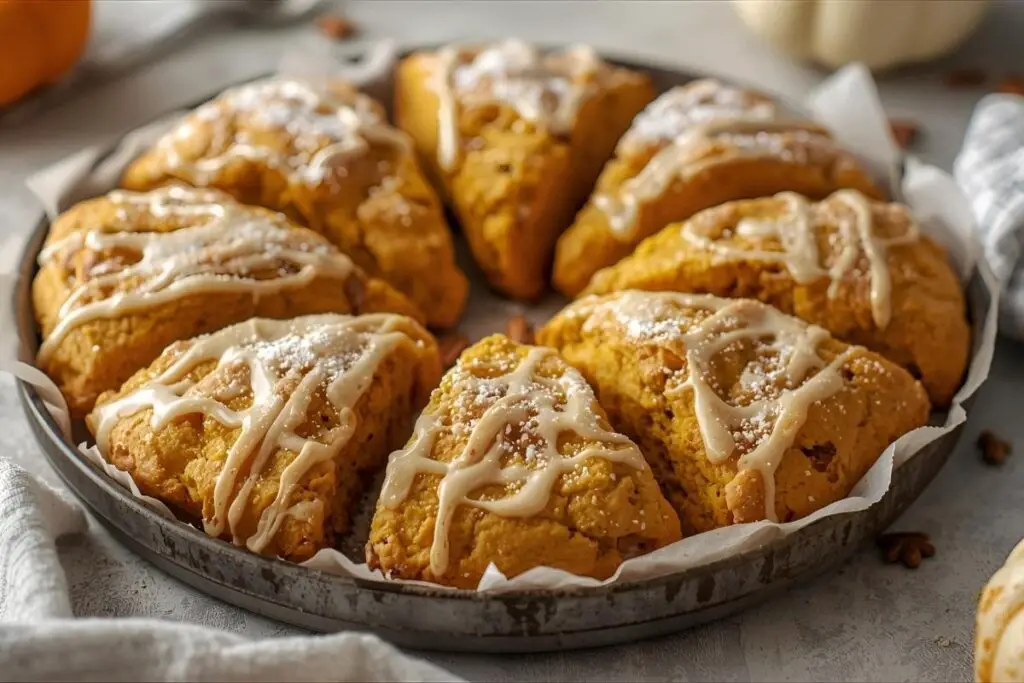
Step 5: Bake and Finish with Glaze
Place the scones on a parchment-lined baking sheet, spacing them evenly. Bake in a preheated 400°F (200°C) oven for 18–22 minutes until they are golden brown and spring back lightly to the touch.
Once out of the oven, let the scones cool slightly before glazing. A simple glaze can be made by mixing powdered sugar, a splash of milk or cream, and a dash of vanilla or cinnamon. Drizzle generously on top for that perfect sweet finish. For a festive touch, sprinkle chopped nuts or a pinch of spice on the glaze.
Serving tip: Serve warm with butter, cream cheese, or your favorite jam. Paired with hot cider or coffee, these scones become the ultimate fall indulgence.
Nutritional Information
A typical bakery-style pumpkin scone (approximately one wedge from this recipe) contains around:
- Calories: 250-280 kcal
- Carbohydrates: 35g
- Protein: 4-5g
- Fat: 10-12g (mostly from butter)
- Fiber: 2-3g
- Sugars: 10-12g
Pumpkin lends natural fiber, vitamins A and C, and antioxidants, making these scones a slightly healthier autumn treat compared to many sweets. The moderate protein content from eggs and whole milk complements the carbs for sustained energy. However, they are naturally higher in fat due to butter, which contributes to that beloved flaky texture.
By making your own scones, you control the sugar level, unlike store-bought versions filled with preservatives and artificial flavors. Using whole, fresh ingredients ensures a wholesome and comforting autumn indulgence.
Healthier Alternatives for the Recipe
If you’re looking to make your bakery-style pumpkin scones a bit healthier without sacrificing flavor, consider these variations:
Whole Wheat Flour Swap: Replace half or all of the all-purpose flour with whole wheat pastry flour for added fiber and nutrients. This will create a denser scone with a nuttier flavor.
Reduce Sugar: Cut down brown sugar by 25-50%. Rely on the natural sweetness of pumpkin and incorporate a glaze with less sugar or none.
Use Coconut Oil Instead of Butter: Swap butter for coconut oil for a dairy-free, plant-based fat option that still promotes flakiness but may add a slight coconut aroma.
Non-Dairy Milk Alternatives: Use almond milk or oat milk with vinegar as a buttermilk substitute for lactose intolerance or vegan diets, noting adjustments in rise and tanginess.
Add Vegetables like Zucchini or Carrots: For an extra health boost, fold grated zucchini or carrot into the mix for moisture and nutrients with minimal impact on taste.
Incorporating these alternatives enables you to customize your scones based on dietary needs and preferences, creating a cozy fall treat that aligns with your health goals.
Serving Suggestions
Bakery-style pumpkin scones are delightfully versatile and pair beautifully with a variety of accompaniments and beverages. For a classic autumn experience, serve them warm with a pat of salted butter alongside a steaming cup of coffee or spiced chai tea. The creaminess of the butter melds perfectly with the spicy pumpkin notes.
For a more indulgent treat, try spreading cream cheese frosting or whipped honey butter over the scones. Add a tart contrast by serving cranberry or apple butter on the side, which complements the warm spices and pumpkin flavor.
Culturally, pumpkin scones echo the flavors of traditional New England fall baking, often enjoyed during Thanksgiving brunch or harvest celebrations. They also work well alongside hearty soups or stews for a seasonal lunch or dinner.
For festive gatherings, plate the scones with fresh fruit, roasted nuts, and a drizzle of maple syrup. Incorporate seasonal decor like cinnamon sticks and mini pumpkins for a cozy atmosphere that enhances the enjoyment.
Common Mistakes to Avoid
Using Warm Butter: Butter should always be cold when mixing into flour. Warm butter melts too quickly and won’t create flaky layers, leading to dense, crumbly scones.
Overmixing the Dough: Mixing too long develops gluten, resulting in tough, chewy scones rather than tender ones. Mix just until ingredients are combined.
Skipping the Resting Period: Allowing dough to chill or rest helps solidify butter and relax gluten, improving texture and rise.
Incorrect Oven Temperature: Baking at too low a temperature causes scones to cook unevenly and become pale and dry. Too high, and they risk burning outside while raw inside.
Not Measuring Ingredients Properly: Baking is precise—too much flour leads to dry scones; too little causes spread and dryness. Use a kitchen scale or spoon and level when measuring.
Ignoring Ingredient Quality: Using canned pumpkin pie filling instead of pure pumpkin puree drastically changes flavor and moisture balance.
By keeping an eye out for these common errors and applying fixes, you’ll improve your success rate with perfect bakery-style pumpkin scones.
Storing Tips for the Recipe
To enjoy your pumpkin scones beyond fresh-baked day, proper storage is essential. Once fully cooled, store scones in an airtight container at room temperature for up to 2 days. For longer storage, refrigeration extends freshness for about 5 days but may slightly dry them out.
Freezing scones is excellent for meal prep—wrap each scone tightly in plastic wrap and place in a freezer-safe bag or container. They freeze well for up to 3 months and can be reheated in the oven or toaster oven directly from frozen, retaining much of their original texture.
For reheating, warm scones at 350°F (175°C) for 10–12 minutes to refresh flakiness and bring back a just-baked aroma. Avoid microwaving repacks as they can become soggy.
Conclusion
Mastering bakery-style pumpkin scones is a rewarding way to celebrate fall flavors in your kitchen. With just a handful of simple ingredients, expert techniques, and versatile recipes, you can create tender, flaky scones that taste like they came straight from your favorite bakery. Whether sharing with family, gifting friends, or enjoying a quiet moment with tea, these pumpkin scones bring warmth and joy to any autumn day.
If you’re inspired by these cozy fall flavors, you might also enjoy exploring other seasonal treats. For example, this guide to pumpkin scones offers another take on bakery-style perfection, while desserts like vanilla chia seed pudding provide a lighter, nutrient-packed option that balances indulgence with health. And of course, no autumn baking collection would be complete without the timeless pumpkin pie recipe—a classic that pairs beautifully with your freshly baked scones for the ultimate fall spread.
FAQs
Q1: Can I use canned pumpkin pie filling instead of pumpkin puree?
No, canned pumpkin pie filling contains sugars and spices, which can throw off the balance of your scones, making them too sweet or altering texture. Always opt for pure pumpkin puree for best control over flavor and moisture.
Q2: How do I make my scones flakier?
Use cold butter cut into the dry ingredients, handle the dough minimally, and don’t overmix. Chilling the dough before baking also helps maintain those flaky layers by solidifying butter that will produce steam during baking.
Q3: Can I make these scones dairy-free or vegan?
Yes! Substitute dairy milk and butter with plant-based alternatives like almond milk and coconut oil or vegan butter. Use a flax or chia egg as an egg replacement, though texture may vary slightly.
Q4: How should I store leftover scones?
Keep cooled scones in airtight containers at room temperature for up to 2 days or freeze wrapped tightly for longer storage (up to 3 months). Reheat in the oven to restore freshness.
Q5: Can I add extra mix-ins like nuts or chocolate chips?
Absolutely! Adding chocolate chips, pecans, or dried cranberries enhances texture and flavor. Fold them into the dough at the wet ingredient stage before shaping.
Q6: What is the best spice blend for pumpkin scones?
Classic warm spices like cinnamon, nutmeg, ginger, and cloves work perfectly. You can also use pre-made pumpkin pie spice blends for convenience.
Q7: Why do my scones turn out dry?
Dry scones often result from too much flour, overbaking, or skipping moist ingredients. Measure flour carefully, avoid overbaking, and ensure your pumpkin puree and buttermilk quantities are accurate.