Table of content
Table of Contents
Introduction
Halloween treats should be fun, festive, and most importantly, easy to make. That’s where No Bake Mummy Oreo Balls come into play. These spooky, bite-sized goodies are the perfect Halloween party treat that requires no oven time but delivers maximum delight. Whether you’re hosting a kids’ party, want a quick after-school snack, or need a creepy sweet for your office potluck, these mummy-inspired Oreo balls are sure to impress.
Not only do they look adorable with their “mummy wrappings” made from white chocolate or candy melts, but they’re also incredibly simple to make in just five easy steps. This no-bake recipe is great for all ages, making it a fantastic project to share with the kids or a last-minute addition when you need something quick and delicious. Read on to discover the spooky secret to this tasty Halloween treat, complete with helpful tips, ingredient swaps, and serving suggestions.
Ingredients List
Here’s what you’ll need to make your No Bake Mummy Oreo Balls:
- Oreo cookies (about 24-28 cookies): The classic cookies provide that perfect balance of crunch and creaminess. You can substitute with any chocolate sandwich cookie.
- Cream cheese (8 oz, softened): This binds the crushed Oreos together for a smooth, creamy texture. For a dairy-free option, try vegan cream cheese.
- White chocolate chips or candy melts (10-12 oz): Used for dipping and creating the mummy wrapping effect. Candy melts are great because they melt evenly and set quickly.
- Mini chocolate chips or edible eyes: To add the “eyes” for that spooky mummy face.
- Optional: Food coloring or sprinkles: For adding extra Halloween flair like colored icing or edible glitter.
Notes and Substitutions:
If you want to keep your treats nut-free, ensure that your chocolate and Oreos are processed in nut-free facilities. For a dairy-free and vegan twist, opt for vegan cream cheese and dark vegan chocolate chips. If Oreos aren’t your favorite, try Nutter Butter or another cookie for a peanut butter flavor. Using candy melts instead of white chocolate chips will help if you want a smoother, less brittle outer layer for your mummy decoration.
Timing
- Preparation time: 15 minutes
- Chilling time: 1 hour
- Total time: Approximately 1 hour and 15 minutes
Even though this is a no-bake recipe, chilling the Oreo mixture and the dipped balls is essential for the best texture and ease of decorating. The cream cheese needs time to firm up within the crushed Oreos, and the chocolate coating sets best when cooled. This timing makes these treats an excellent option for a quick afternoon project or last-minute Halloween party prep.
Step-by-Step Instructions
Step 1: Crush the Oreos
Start by placing the Oreo cookies into a food processor and pulse until finely ground. If you don’t have a food processor, put the cookies in a zip-top bag and crush them with a rolling pin until you get fine crumbs. Aim for even crumbs so that the mixture holds together well. Avoid overprocessing into powder; some texture is good for bite.
Pro tip: Make sure to leave the cream filling inside the Oreos before crushing; it adds sweetness and helps the mixture stick.
Step 2: Mix in the Cream Cheese
Transfer the crushed Oreos to a mixing bowl and add the softened cream cheese. Using a spatula or your hands, combine thoroughly until a sticky dough forms. This mixture should be moldable without falling apart but not overly wet.
For ease, chill the cream cheese slightly before mixing to avoid it becoming too runny. The cream cheese not only gives moisture but also richness that balances the cookie’s chocolate flavor.
Step 3: Shape the Oreo Balls
Roll the mixture into 1-inch balls and place them on a baking sheet lined with parchment or wax paper. Try to keep the balls uniform for even dipping. Pop the tray into the fridge for at least 30 minutes to firm up.
Variations:
You can shape the mixture into mini mummies or ovals instead of balls if you want a more mummy-like shape. For extra creativity, mix in mini chocolate chips or crushed nuts at this stage to add texture.
Step 4: Dip and Decorate
Melt your white chocolate chips or candy melts according to package instructions—usually in the microwave in short bursts or using a double boiler. Dip each chilled Oreo ball into the melted chocolate, covering it fully. Place it back on parchment.
Before the coating sets, use drizzled melted chocolate or a piping bag to create “mummy wrappings” — lines crossing over each other to mimic bandages. Add mini chocolate chips or edible eyes while the coating is still wet so they stick.
Cooking science tip: Melting chocolate at too high a temperature can cause it to seize or become grainy, which will ruin the smooth coating texture. Keep heat low and stir frequently.
Step 5: Chill and Serve
Once decorated, chill the balls again until the chocolate sets completely—about 15-20 minutes. Serve on a festive Halloween platter or store in an airtight container in the fridge. These No Bake Mummy Oreo Balls can stay fresh for up to a week chilled.
When serving, consider pairing them with other seasonal treats like caramel apples or pumpkin-flavored goodies to amplify the Halloween experience.
Print
No Bake Mummy Oreo Balls
- Total Time: 1h 15 mins
- Yield: 24 balls
Description
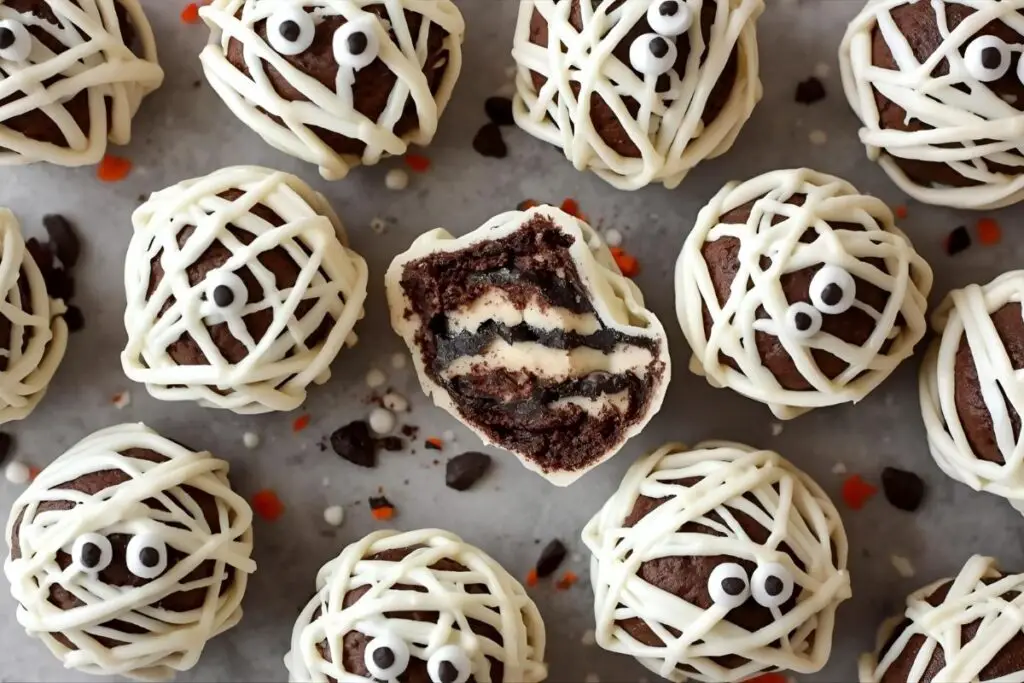
Spooky, fun, and easy — these No Bake Mummy Oreo Balls are the ultimate Halloween treat! Made with crushed Oreos, cream cheese, and a smooth white chocolate coating, they’re decorated to look like mini mummies with candy eyes. Perfect for parties, potlucks, or a quick festive snack, these bite-sized delights come together in just a few simple steps — no oven required!
Ingredients
- 24–28 Oreo cookies (keep the cream filling)
- 8 oz cream cheese, softened (or vegan cream cheese for dairy-free)
- 10–12 oz white chocolate chips or candy melts
- Mini chocolate chips or edible candy eyes
- Optional: food coloring, sprinkles, or edible glitter for decoration
- Prep Time: 15 mins
- Cook Time: 0 mins
- Category: Weight Loss Meals
- Method: No-Bake
- Cuisine: American
Nutritional Information
On average, one No Bake Mummy Oreo Ball contains approximately:
- Calories: 110-130
- Fat: 7-9 grams
- Carbohydrates: 12-14 grams
- Protein: 1-2 grams
- Sugar: 10-12 grams
While these treats are indulgent, they do offer some benefits. The cream cheese provides a small amount of calcium and protein, while dark chocolate (if used) brings antioxidants. However, due to their sugar and fat content, it’s best to enjoy these in moderation as a festive treat rather than a daily snack.
Consider pairing with fruit or nuts for a more balanced Halloween spread.
Healthier Alternatives for the Recipe
For those wanting a lighter twist, here are some alternatives:
- Use reduced-fat cream cheese: This cuts down on saturated fat without sacrificing texture.
- Try Greek yogurt instead of cream cheese: Mix finely crushed Oreos with Greek yogurt for a tangy, protein-packed base. Freeze instead of chilling for a different texture.
- Swap Oreos for graham crackers or oat cookies: Lower sugar and calories, plus a different flavor profile.
- Dark chocolate coating: Use 70% cocoa or higher dark chocolate instead of candy melts for a less sweet, antioxidant-rich option.
These swaps reduce calories and include more functional nutrients while still maintaining that fun mummy look and taste.
Serving Suggestions
No Bake Mummy Oreo Balls are naturally a crowd pleaser at Halloween parties but can also be adapted for other spooky occasions or themed events. Pairing them with a hot cup of spiced apple cider or pumpkin spice latte makes a cozy autumn snack combo.
Culturally, decorating sweet treats to resemble spooky characters mirrors traditions like Mexican Día de los Muertos sugar skulls, where playful yet respectful representations of the dead are crafted. You can heighten the vibe by serving the mummy balls alongside other themed desserts—ghost-shaped marshmallows, candy corn, or black licorice.
For outdoor Halloween gatherings, place these treats on a decorative platter with spider web doilies and small plastic spiders for extra flair.
Common Mistakes to Avoid
- Not chilling the mixture enough: If your Oreo ball mixture is too soft, they won’t hold their shape and will fall apart during dipping. Fix by chilling longer before dipping.
- Overheating the chocolate: This causes clumpy or burnt chocolate that won’t coat properly. Use low heat and stir often.
- Making balls too big or uneven: Inconsistent size leads to uneven chilling and messy decorations. Use a cookie scoop for uniformity.
- Waiting too long to add eyes: Place eyes while chocolate is still wet to ensure they stick properly.
- Using stale Oreos: Fresh cookies provide better texture and flavor; stale ones can lead to bland or tough balls.
Following these tips helps ensure your mummy balls look professional and taste fantastic.
Storing Tips for the Recipe
To keep your No Bake Mummy Oreo Balls fresh, store them in an airtight container in the refrigerator where they’ll last up to a week. If you want to prepare in advance or save leftovers longer, freezing is an option. Place them in a single layer on parchment paper inside a freezer-safe container or bag for up to 3 months. Thaw overnight in the fridge before serving.
For meal prep or party platters, chill fully after decorating, then stack gently with wax paper layers between to avoid sticking or damaging delicate mummy details.
Conclusion
No Bake Mummy Oreo Balls are a perfect blend of spooky fun and delicious simplicity. With just five easy steps, anyone can create these adorable Halloween treats that impress guests and satisfy sweet cravings without baking. Whether you stick to the classic recipe or try some healthier twists, these mummy balls guarantee a crowd-pleasing, no-fuss dessert. Try making them this Halloween and share the delight with your family and friends!
If you’re excited to try these spooky No Bake Mummy Oreo Balls, you’ll love how easy and fun they are to make. For more inspiration, you can also check out this step-by-step guide from Belly Full that shows another fun take on these Halloween treats. And if you’re in the mood for more festive baking, don’t miss the Pumpkin Cheesecake Thumbprints — a cozy fall dessert that perfectly complements your mummy creations on any holiday table.
FAQs
Q: Can I make the Oreo balls ahead of time?
Yes! You can prepare the Oreo balls a day or two in advance and store them in the refrigerator. Just wait to dip and decorate until ready to serve for best texture.
Q: What if I don’t have a food processor?
No worries! Place Oreos in a sealed bag and crush them with a rolling pin or heavy pan until finely ground. This might take a bit longer but works just as well.
Q: Can I use milk chocolate instead of white?
Absolutely, but the mummy wrapping detail works best with white chocolate or candy melts as they contrast well with the dark Oreo ball surface.
Q: Are these safe for kids to make?
Yes! The no-bake method is especially kid-friendly. Just supervise when handling melted chocolate to avoid burns.
Q: How do I get the candy eyes to stick?
Apply the eyes while the chocolate coating is still wet. If the chocolate has set, use a small dab of melted chocolate as “glue” to attach them.