Table of content
Table of Contents
Introduction
As the leaves begin to turn and the air carries that unmistakable crispness, something about fall just screams cozy treats. If you’ve been on the lookout for a dessert that perfectly captures the essence of the season without involving complicated bakes or hours in the kitchen, pumpkin cheesecake thumbprints are here to delight your senses.
These delightful cookies blend the warm, comforting flavors of pumpkin spice with the luscious creaminess of cheesecake, all packed into easy-to-make thumbprint cookies. Pumpkin cheesecake thumbprints satisfy that craving for autumnal sweets with just the right balance of texture—soft cookie bases with a tangy, velvety filling nestled right in the center. Whether you’re baking for a family gathering, a casual get-together, or simply treating yourself on a crisp fall evening, these little bites are both impressive and incredibly simple.
What’s more, you can whip them up in five easy steps, making them accessible even for novice bakers. No need to fret over complex layering or delicate frostings—just pure fall flavor, a bit of creativity, and some thumb action.
In this recipe, you’ll learn everything from selecting the best ingredients to baking the perfect texture and serving these festive treats with style. Ready to bring a touch of creamy, pumpkin-spiced magic to your baking routine? Let’s dive straight into the recipe for pumpkin cheesecake thumbprints that will quickly become a seasonal favorite.
Ingredients List
Making the perfect batch of pumpkin cheesecake thumbprints starts with understanding each ingredient’s role in creating the right flavors and textures. Here’s a detailed list, along with substitutions and notes to help you customize your treat.
All-purpose flour (1 ¾ cups): The backbone of the cookie dough, flour provides the structure. Using all-purpose flour strikes a good balance between tenderness and sturdiness. For a gluten-free version, you can substitute with a 1:1 gluten-free flour blend.
Pumpkin puree (½ cup): Not pumpkin pie filling! Pure canned pumpkin or homemade pumpkin puree adds moisture and that essential autumnal flavor. It also contributes to the soft texture of the cookie base.
Granulated sugar (¾ cup): Sweetens the dough. You may swap in coconut sugar or brown sugar for a deeper, caramelized flavor that complements the pumpkin spices.
Brown sugar (¼ cup, packed): Adds moisture and richness, balancing the dryness of the flour with a slight molasses note.
Unsalted butter (½ cup, softened): Provides richness and tenderness. Unsalted is crucial because it gives you full control over the salt content.
Cream cheese (8 ounces, softened): The star of the filling, cream cheese gives that classic, creamy texture. For a lighter version, you can use Neufchâtel cheese or reduced-fat cream cheese.
Vanilla extract (1 teaspoon): Enhances the overall flavor with its sweet aroma that complements both pumpkin and cream cheese beautifully.
Ground cinnamon (1 teaspoon), ground nutmeg (½ teaspoon), ground ginger (½ teaspoon), ground cloves (¼ teaspoon): These warm spices make up the quintessential pumpkin pie spice blend. You can use a pre-mixed pumpkin pie spice or adjust the ratios to your liking.
Egg (1 large): Binds the dough, adds richness, and contributes to tenderness by helping with leavening.
Baking powder (½ teaspoon): Helps the cookies rise slightly, ensuring they’re soft and not dense.
Salt (¼ teaspoon): Balances sweetness and enhances flavor.
Each ingredient complements the others, creating a cookie that perfectly balances softness, creaminess, and the warm spices of fall. Think of the dough as a moist, tender shell holding the creamy, tangy cheesecake center—the texture and flavor contrast is what makes pumpkin cheesecake thumbprints truly special.
Timing
Timing is key when making pumpkin cheesecake thumbprints to achieve the perfect balance between fluffy cream cheese filling and tender cookie dough. Preparation time typically takes about 20 to 30 minutes, including mixing and shaping the cookies. Baking requires around 12 to 15 minutes per batch, with additional cooling time to allow the cheesecake filling to set.
Total time from start to finish should be approximately 1 hour, considering prep, baking, and cooling. It’s essential to let the cookies cool properly to avoid the filling from becoming runny or melting too much. Chilling the dough briefly before baking can also help maintain cookie shape and prevent spreading.
Leaving the thumbprint indentation deep enough before adding the filling is another small timing detail—adding cream cheese too early or baking right after filling can affect texture. Patience results in that perfect creamy center smoothly resting inside a soft, spiced cookie shell.
Step-by-Step Instructions
Print
Pumpkin Cheesecake Thumbprints: 5 Easy Steps for Creamy Fall Treats
- Total Time: 45 mins
- Yield: 24 cookies
Description
Cozy up with these Pumpkin Cheesecake Thumbprints – soft, spiced pumpkin cookies with a creamy cheesecake center. Perfect for fall gatherings, gifting, or enjoying with a warm cup of cider, they’re an easy yet impressive seasonal treat.
Ingredients
- 1 ¾ cups all-purpose flour
- ½ cup pumpkin puree (not pie filling)
- ¾ cup granulated sugar
- ¼ cup brown sugar, packed
- ½ cup unsalted butter, softened
- 8 oz cream cheese, softened
- 1 teaspoon vanilla extract
- 1 teaspoon ground cinnamon
- ½ teaspoon ground nutmeg
- ½ teaspoon ground ginger
- ¼ teaspoon ground cloves
- 1 large egg
- ½ teaspoon baking powder
- ¼ teaspoon salt
- Prep Time: 30 mins
- Cook Time: 15 mins
- Category: Weight Loss Meals
- Method: Baking
- Cuisine: American
Step 1: Prepare the Cookie Dough
Begin by creaming your softened unsalted butter with the granulated and brown sugars until the mixture is light and fluffy. This step incorporates air into the dough, giving your cookies a tender texture. Add in the egg and vanilla extract, mixing well to fully combine.
In a separate bowl, whisk together the all-purpose flour, baking powder, salt, and your pumpkin spice blend (cinnamon, nutmeg, ginger, and cloves). Slowly add the dry ingredients to the wet mixture, alternating with pumpkin puree. This ensures the dough stays soft and uniformly mixed without becoming heavy or overworked.
Pro tip: Don’t over mix once you add the flour, or your cookies may turn out tough. Mix just until combined for the best texture.
Step 2: Chill the Dough
Once your dough is formed, cover it tightly with plastic wrap and chill it in the refrigerator for at least 30 minutes. Chilling firms up the butter and pumpkin puree, which helps control spread during baking, keeping the cookies thick and soft.
Pro tip: If you’re short on time, freezing the dough balls for 10–15 minutes can speed this up. Also, chilled dough is easier to handle when rolling into balls.
Step 3: Form the Thumbprint Indentations
Preheat your oven to 350°F (175°C). Roll the chilled dough into 1-inch balls and place them on a lined baking sheet, about 2 inches apart. Use your thumb or the back of a small spoon to make a deep indentation in the center of each ball.
If you want a twist, try making different-sized indentations to create a variety of filling sizes, or add a little flourish by using a small pastry tip or the end of a wooden spoon handle for uniformity. You can even roll the dough balls in crushed pecans or cinnamon sugar for extra texture on the outside.
Step 4: Prepare the Cream Cheese Filling and Bake
In a small bowl, beat the softened cream cheese with a tablespoon of sugar and a splash of vanilla extract until smooth and fluffy. This filling should be light, creamy, and sweet but balanced so that it complements rather than overpowers the pumpkin spices.
Fill each thumbprint indentation with approximately a teaspoon of the cream cheese filling. Be careful not to overfill, as the filling will bubble and spread slightly during baking.
Place the tray in the preheated oven and bake for 12 to 15 minutes, or until the cookies are just set and lightly golden around the edges. The cream cheese filling may crack slightly on top—that’s normal and adds character.
Science tip: Baking at a moderate temperature allows the filling to set without curdling or browning excessively, while the cookie base gently cooks through for optimal softness.
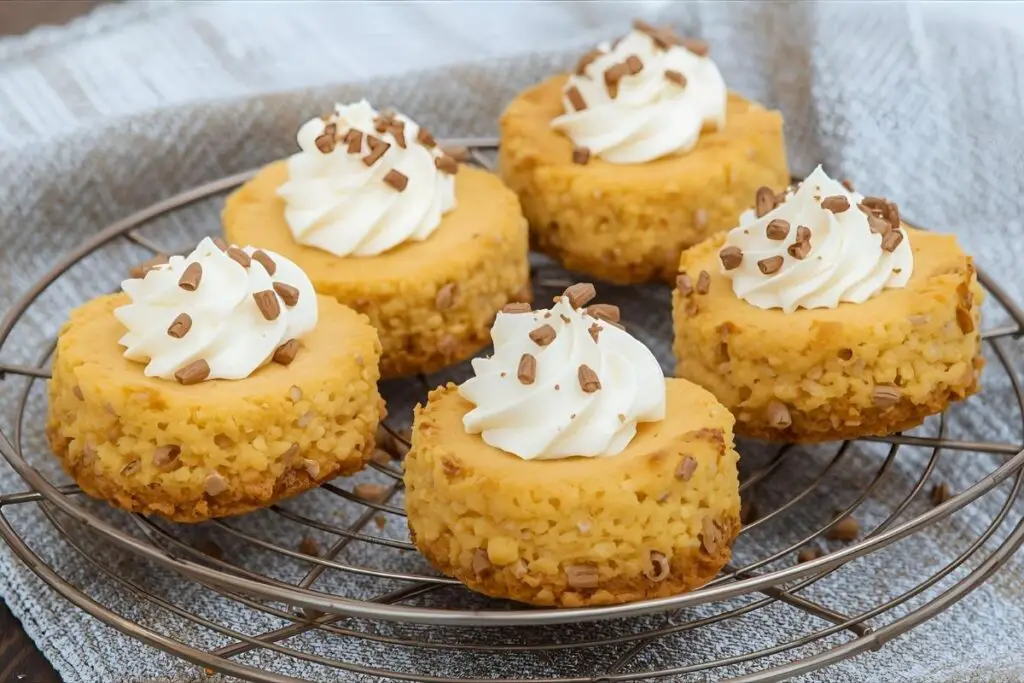
Step 5: Cool and Serve
Once baked, remove the cookies from the oven and allow them to cool on the pan for about 5 minutes before transferring them to a wire rack to cool completely. Cooling is essential to let the cream cheese filling firm up and for the cookies to achieve the perfect melt-in-your-mouth texture.
For serving, these thumbprints look vibrant dusted with a light sprinkle of cinnamon or powdered sugar. You can also drizzle them with a caramel sauce or honey for extra sweetness and visual appeal. Pair these cookies with a hot cup of spiced apple cider or a creamy latte to enhance the fall experience.
If you want to make them extra festive, add a small dollop of pumpkin butter or a sprinkling of toasted pecans on the cream cheese before baking. For a vibrant pop of color, a little dollop of cranberry sauce on top after cooling gives a delicious tart contrast.
Not only are these cookies delightful on their own, but they’re also perfect as part of a dessert platter at parties, gifting in holiday tins, or just savoring during an afternoon tea. Their creamy centers and soft spiced dough truly make pumpkin cheesecake thumbprints a memorable fall treat.
Nutritional Information
Each serving of pumpkin cheesecake thumbprints—typically one cookie—provides approximately:
- Calories: 150–180 kcal
- Fat: 8–10g (mostly from butter and cream cheese)
- Carbohydrates: 18–22g (from flour and sugars)
- Protein: 2–3g
- Fiber: 1–2g (from pumpkin and flour)
- Sugar: 12–14g
While these cookies are definitely a treat, pumpkin adds nutritional benefits. It’s rich in vitamin A, antioxidants, and fiber, boosting the healthfulness of this dessert compared to standard sugar cookies. The cream cheese supplies calcium and protein, contributing to satiety.
To keep this dessert balanced, enjoy pumpkin cheesecake thumbprints as part of a well-rounded fall menu alongside fruits, nuts, and other wholesome snacks. With moderate portion sizes, these cookies satisfy your seasonal sweet tooth without going overboard.
Healthier Alternatives for the Recipe
Looking to make pumpkin cheesecake thumbprints with a healthier twist? Here are several variations with explanations for each:
Whole Wheat Flour Substitute
Swap out all-purpose flour for whole wheat pastry flour for added fiber and a nutty flavor. This substitution makes the cookies heartier and improves digestion without significantly changing texture.Sugar Alternatives
Replace granulated sugar with natural sweeteners like maple syrup or honey for antioxidants and lower glycemic impact. You may need to adjust liquid quantities slightly to maintain dough consistency.Low-Fat or Greek Yogurt Cream Cheese Filling
Use Greek yogurt blended with cream cheese for a tangy filling that is lower in fat but still creamy. This variation ups the protein while cutting calories.Egg Replacement
If you’re vegan or allergic, substitute the egg with a flaxseed “egg” (1 tablespoon ground flaxseed + 3 tablespoons water) to bind the dough. This adds omega-3 fatty acids and fiber.Pumpkin Spice Variations
Use fresh grated ginger or turmeric instead of or alongside traditional pumpkin pie spices for added antioxidants and anti-inflammatory benefits.
Each of these tweaks keeps the essence of the pumpkin cheesecake thumbprints intact but nudges the recipe toward more nutrient-dense or dietary-friendly options.
Serving Suggestions
Pumpkin cheesecake thumbprints are wonderfully versatile when it comes to serving.
Seasonal Pairings
They pair beautifully with warm fall beverages—think cinnamon-spiced cider, chai tea lattes, or pumpkin spice coffee. The spices in the cookies mirror those in the drinks, creating a cohesive flavor experience.
Cultural Twists
Try serving them alongside a scoop of vanilla bean ice cream sprinkled with crushed ginger snaps for a North American autumn-inspired dessert. Or, for a European touch, accompany them with a dollop of fruit preserves like lingonberry or quince paste.
Festive Presentation
Arrange them on a wooden board with other fall treats like candied pecans, caramel popcorn, and mini apple tarts for a harvest dessert platter. Garnish the platter with fresh autumn leaves and small gourds for a visual feast.
Gift Ideas
These cookies make thoughtful homemade gifts. Pack them in decorative tins with parchment paper, tied with rustic twine and a cinnamon stick for a charming touch.
Serving pumpkin cheesecake thumbprints warm or at room temperature enhances the creamy filling and fluffy cookie balance. Whichever way you choose, these treats make any fall gathering feel special and comforting.
Common Mistakes to Avoid
Here are some common pitfalls when making pumpkin cheesecake thumbprints and how to avoid them:
Using Pumpkin Pie Filling Instead of Puree
Pumpkin pie filling contains added spices and sugar, which can throw off the balance of the dough, making it too sweet or wet. Always choose pure pumpkin puree for better control.Skipping Dough Chilling
Failing to chill the dough often causes cookies to spread too thin and lose their shape. Always chill for at least 30 minutes to maintain thick, tender cookies.Overfilling the Thumbprints
Too much cream cheese filling can spill over during baking, causing uneven textures and messiness. Use about one teaspoon per indentation and keep it shallow.Overbaking the Cookies
Pumpkin cookies are best soft and moist. Overbaking can dry them out. Remove from oven when edges are set and cream cheese is just forming a thin crust.Not Softening Cream Cheese Properly
Cold cream cheese lumps won’t blend well into a smooth filling, leading to patchy cream cheese centers. Let it warm to room temperature and beat until smooth before filling.
Avoiding these mistakes ensures your pumpkin cheesecake thumbprints bake up perfectly every time—creamy, spiced, and irresistibly tender.
Storing Tips for the Recipe
Proper storage ensures your pumpkin cheesecake thumbprints stay fresh and delicious for days.
Room Temperature: Store in an airtight container layered with parchment paper for up to 2 days. Best consumed fresh.
Refrigeration: Cookies with cream cheese filling benefit from refrigeration to keep the filling firm and safe. Place them in an airtight container and refrigerate for up to 5 days.
Freezing Dough: To bake later, shape the dough balls, freeze on a tray until solid, then transfer to a freezer-safe bag. Bake from frozen adding a couple of extra minutes to baking time.
Freezing Baked Cookies: Freeze cooled baked cookies in airtight containers or freezer bags for up to 3 months. Thaw in the refrigerator overnight before serving.
For meal prepping or gifting, freezing baked cookies maintains texture and flavor longer. When reheating, a quick microwave burst (10-15 seconds) or warming in a low oven revitalizes the cream cheese creaminess.
Conclusion
Pumpkin cheesecake thumbprints are the perfect fall dessert, combining ease, taste, and a creamy texture that delights with every bite. With just five simple steps and everyday ingredients, you can bring the cozy flavors of autumn into your kitchen and wow family and friends.If you’re looking to try different takes on this cozy fall dessert, you’ll love the variety of options available online. For a classic version, check out Delish’s Pumpkin Cheesecake Thumbprints, which keeps things simple and delicious. If you prefer a slightly easier approach with a cheesecake twist, Sabrina Currie’s recipe offers a straightforward method that’s beginner-friendly. For more fall dessert inspiration, you might also enjoy seasonal favorites like Layered Pumpkin Delight or bite-sized Mini Pumpkin Pies, both of which are perfect for gatherings and festive tables.
FAQs
Q1: Can I make pumpkin cheesecake thumbprints dairy-free?
Yes! Use dairy-free cream cheese alternatives like those made from cashews or coconut. Swap butter for plant-based margarine or coconut oil, and ensure any added sugar or flavorings are vegan-friendly.
Q2: How long do pumpkin cheesecake thumbprints last?
Stored in the refrigerator, these cookies last about 4 to 5 days. Because of the cream cheese filling, it’s best not to keep them at room temperature for more than a day to avoid spoilage.
Q3: Can I prepare the dough in advance?
Absolutely. The dough can be shaped into balls and stored in the fridge for up to 2 days or frozen for up to 3 months. Just thaw and bake when ready.
Q4: What’s the best way to keep the cream cheese filling from cracking?
Ensure the cream cheese is smooth and not overfilled in the thumbprints. Baking at 350°F allows gentle setting. Cracking is natural but minimizing filling depth and avoiding overbaking helps reduce it.
Q5: Can I substitute pumpkin for sweet potato in this recipe?
Yes, mashed cooked sweet potato works well as a substitute, providing a similar texture and mild sweetness, though the flavor will be slightly different without the classic pumpkin spice notes.
Q6: Are these cookies suitable for freezing after baking?
Yes, let the cookies cool completely, then freeze in airtight containers. They can be thawed overnight in the fridge and briefly warmed before serving for best taste.
Q7: Can I add nuts or chocolate chips to the dough?
Definitely! Chopped pecans or walnuts add a lovely crunch, while mini chocolate chips introduce extra sweetness that pairs nicely with pumpkin spices. Fold them into the dough before chilling.